Hi
I'm using the v1.5.5.1
I'm trying to horizontally align the product options. At present my template aligns them in a default manner which is vertical and takes up space.
You can see my page here:
http://bearspectacles.co.uk/index.php?r ... duct_id=52
How can I get the options to:
a) align themselves horizontally
b) have the radio button beneath the text and image
I'm looking for the options to be laid out like this:
http://www.eyewearbrands.com/polo%20ral ... 1%20black/
Many Thanks

It all comes down to the catalog/view/theme/default/template/product/product.tpl file
There is a long section of options with each different type of options and the html is entered there.
Unfortunately they are broken up with <br> tags instead of proper css so you have to edit the html code there.
Hopefully in 2.0 this will be handled with css and can be done just with stylesheets.
There is a long section of options with each different type of options and the html is entered there.
Unfortunately they are broken up with <br> tags instead of proper css so you have to edit the html code there.
Hopefully in 2.0 this will be handled with css and can be done just with stylesheets.

I'm using the Sellya ThemeQphoria wrote:REMOVE the <br> tagsajassat wrote:Ok, so are you suggesting I go into product.tpl and add the <br/> tags?
I've looked at my theme's product.tpl - there appears to be no <br> tags to remove?
The theme author does not provide customisation support.Qphoria wrote:Well i can only speak for the default theme. For sellya you might need to ask the theme author
Here is the code for image type options.
Code: Select all
<?php if ($option['type'] == 'image') { ?>
        <div id="option-<?php echo $option['product_option_id']; ?>" class="option">
          <div class="option-l"><?php if ($option['required']) { ?>
          <span class="required">*</span>
          <?php } ?>
          <b><?php echo $option['name']; ?>:</b></div>
            <div class="option-r"> <table class="option-image">
              <?php foreach ($option['option_value'] as $option_value) { ?>


              <tr>
                <td style="width: 1px;"><input type="radio" name="option[<?php echo $option['product_option_id']; ?>]" value="<?php echo $option_value['product_option_value_id']; ?>" id="option-value-<?php echo $option_value['product_option_value_id']; ?>" /></td>
				<td"><label for="option-value-<?php echo $option_value['product_option_value_id']; ?>"><img src="<?php echo $option_value['image']; ?>" alt="<?php echo $option_value['name'] . ($option_value['price'] ? ' ' . $option_value['price_prefix'] . $option_value['price'] : ''); ?>" /></label></td>
                <td><label for="option-value-<?php echo $option_value['product_option_value_id']; ?>"><?php echo $option_value['name']; ?>
                    <?php if ($option_value['price']) { ?>
                    (<?php echo $option_value['price_prefix']; ?><?php echo $option_value['price']; ?>)
                    <?php } ?>
                  </label></td>
              </tr>

              <?php } ?>
            </table></div>
        </div>

<?php } ?>ok so in that theme he uses table rows
The <tr> should be moved before the foreach
the </tr> should be moved outside of the foreach
So Change:
To:
But that is the most simplistic of changes. If you have more than a couple options it will just go on and on and on overlapping the right column. So quite a bit of customization may be needed there.
The <tr> should be moved before the foreach
the </tr> should be moved outside of the foreach
So Change:
Code: Select all
<?php foreach ($option['option_value'] as $option_value) { ?>
    <tr>
    .......
    .......
    </tr>
<?php } ?>Code: Select all
<tr>
<?php foreach ($option['option_value'] as $option_value) { ?>
    .......
    .......
<?php } ?>
</tr>
That's brilliant. My page now looks like this:Qphoria wrote:ok so in that theme he uses table rows
The <tr> should be moved before the foreach
the </tr> should be moved outside of the foreach
So Change:To:Code: Select all
<?php foreach ($option['option_value'] as $option_value) { ?> <tr> ....... ....... </tr> <?php } ?>But that is the most simplistic of changes. If you have more than a couple options it will just go on and on and on overlapping the right column. So quite a bit of customization may be needed there.Code: Select all
<tr>
<?php foreach ($option['option_value'] as $option_value) { ?>
    .......
    .......
<?php } ?>
</tr>
http://bearspectacles.co.uk/index.php?r ... duct_id=56
The only thing remaining is putting the image first, then the label directly underneath, followed by the radio button under that.
How would I do that?
If that whole thing is a table layout, then the sequence will be <table><tr><td></td></tr></table>, and there will be sets of <tr><td></td></tr>, and within those there will be sets of <td></td>. Mind your nesting and just move a given <tr><td></td></tr> or a given <td></td> to where you want it.
Another other way is to assign each of those its own class and give it an in-line style commanding position, layer, and opacity, but you're probably not ready for that, and it's css beyond the scope here.
In the future first find out whether a theme is supported.
Another other way is to assign each of those its own class and give it an in-line style commanding position, layer, and opacity, but you're probably not ready for that, and it's css beyond the scope here.
In the future first find out whether a theme is supported.
That theme adds complexity to this step.
You basically have a table there with 2 <td> cells
the first has the radio <input>
the second has the <img>
and the third has the <label>
You want the image first, then the label, then the input.. so you could easily swap those 3 places by moving the <td>...</td> blocks around. But to get it to be OVER each other means you also need to add
<tr> before every <td>
and </tr> after every </td>
Except the first and last <td> inside the foreach you don't need to add it since it already exists outside of the for loop.
Ok, so I did what you said but now I've lost the horizontal alignmentQphoria wrote:That theme adds complexity to this step.
You basically have a table there with 2 <td> cells
the first has the radio <input>
the second has the <img>
and the third has the <label>
You want the image first, then the label, then the input.. so you could easily swap those 3 places by moving the <td>...</td> blocks around. But to get it to be OVER each other means you also need to add
<tr> before every <td>
and </tr> after every </td>
Except the first and last <td> inside the foreach you don't need to add it since it already exists outside of the for loop.
http://bearspectacles.co.uk/index.php?r ... duct_id=56
Here is the code:
Code: Select all
<?php } ?>
        <?php if ($option['type'] == 'image') { ?>
        <div id="option-<?php echo $option['product_option_id']; ?>" class="option">
          <div class="option-l"><?php if ($option['required']) { ?>
          <span class="required">*</span>
          <?php } ?>
          <b><?php echo $option['name']; ?>:</b></div>

            <div class="option-r"> <table class="option-image">
			<tr>
              <?php foreach ($option['option_value'] as $option_value) { ?>
			  <td><label for="option-value-<?php echo $option_value['product_option_value_id']; ?>"><img src="<?php echo $option_value['image']; ?>" alt="<?php echo $option_value['name'] . ($option_value['price'] ? ' ' . $option_value['price_prefix'] . $option_value['price'] : ''); ?>" /></label></td>


			<tr>
              <td><label for="option-value-<?php echo $option_value['product_option_value_id']; ?>"><?php echo $option_value['name']; ?>
                    <?php if ($option_value['price']) { ?>
                    (<?php echo $option_value['price_prefix']; ?><?php echo $option_value['price']; ?>)
                    <?php } ?>
                  </label></td>
		    </tr>

			<tr>
			  <td style="width: 1px;"><input type="radio" name="option[<?php echo $option['product_option_id']; ?>]" value="<?php echo $option_value['product_option_value_id']; ?>" id="option-value-<?php echo $option_value['product_option_value_id']; ?>" /></td>
			 </tr>
             <div>
              <?php } ?>
			  </tr>
            </table></div>
</div>About 1/3 of the way down one </tr> is missing between a </td> and a <tr>. You bought a theme rather than doing everything yourself in the first place, and theme authors make decisions without accommodating every possible further customization. You can start with a copy of the default and see how the whole thing originally works. You can also look at the abundant html and css tutorials on-line. You don't understand tables, you're not proofreading, and you want it spoon-fed. Start proofreading and reading.
I fixed the missing </tr> but I thought it wasn't required because there was one outside of the for loop anywaybutte wrote:About 1/3 of the way down one </tr> is missing between a </td> and a <tr>. You bought a theme rather than doing everything yourself in the first place, and theme authors make decisions without accommodating every possible further customization. You can start with a copy of the default and see how the whole thing originally works. You can also look at the abundant html and css tutorials on-line. You don't understand tables, you're not proofreading, and you want it spoon-fed. Start proofreading and reading.
I understand tables. <tr> is a row and <td> is a cell. So for each option I now have three rows with a single cell in each.
My issue is how do I get the set of three rows containing a single cell next to each other horizontally. Another table within a table?
Every TD remains horizontal within a TR. Put them inside one TR. You can assign widths to each TD, as width="33%" or whatever. Any tutorial will show that.
Make a printout of that section. WIth a marker sort out the TR sets and the TD sets to see how they are nested. And do look at some html tutorials. They will widen your eyes with wonderfulness.
Make a printout of that section. WIth a marker sort out the TR sets and the TD sets to see how they are nested. And do look at some html tutorials. They will widen your eyes with wonderfulness.
Bingo!
It all makes perfect sense now. Got my page sorted. Just needs styling now.
http://bearspectacles.co.uk/index.php?r ... duct_id=56
It all makes perfect sense now. Got my page sorted. Just needs styling now.
http://bearspectacles.co.uk/index.php?r ... duct_id=56
Hi ajassat.Bingo!
It all makes perfect sense now. Got my page sorted. Just needs styling now.
I've got my styling figured out..
Could you send me the code that worked for you.
Many thanks in advance !
See any on first page of "html tutorial tables" datadump:
https://www.google.com/search?q=html+tu ... s&ie=utf-8
https://www.google.com/search?q=html+tu ... s&ie=utf-8

Hoping QPhoria might come back with some help. We're trying to get our select/dropdown options to stay together with the name of the option.
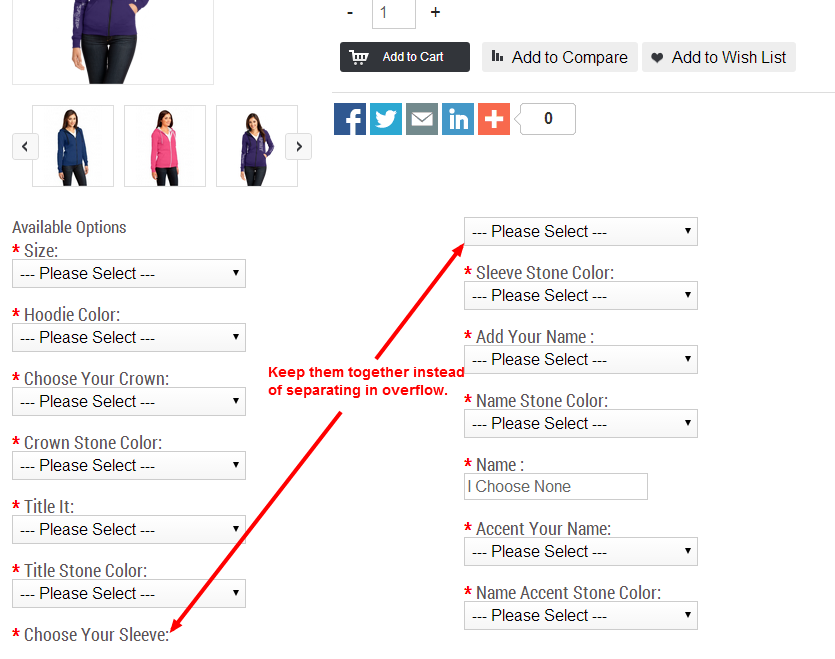 Is this possible and what do we need to do to fix this. Tables? Table Rows? Array? and if Tables and Rows, where do I begin to put those tags so that it works. Tried doing it but kept breaking the page.
Thanks in advance for your help!
Jordi
Option Name Separation.png (94.93 KiB) Viewed 4661 times
Code: Select all
<?php if ($options) { ?>
   <h2><?php echo $text_option; ?></h2>
        <?php foreach ($options as $option) { ?>
        <?php if ($option['type'] == 'select') { ?>
        <div id="option-<?php echo $option['product_option_id']; ?>" class="option">
          <div id="opname"><?php if ($option['required']) { ?>
          <span class="required">*</span>
          <?php } ?>
          <?php echo $option['name']; ?>:</div>
          <select name="option[<?php echo $option['product_option_id']; ?>]">
            <option value=""><?php echo $text_select; ?></option>
            <?php foreach ($option['option_value'] as $option_value) { ?>
            <option value="<?php echo $option_value['product_option_value_id']; ?>"><?php echo $option_value['name']; ?>
            <?php if ($option_value['price']) { ?>
            (<?php echo $option_value['price_prefix']; ?><?php echo $option_value['price']; ?>)
            <?php } ?>
            </option>
            <?php } ?>
          </select>
        </div>
        <br />
<?php } ?>Thanks in advance for your help!
Jordi
IF you try tables . . .
(1) Whether you're trying to restructure somebody else's tables or trying to set up your own tables, it can be helpful to make printouts and use colored highlighters to see vividly where the table <table></table> are, where next the rows' <tr></tr> are, and where within rows the cells' <td></td> are, while you're learning how they work. In the simple case, table opens, row opens, cell opens and closes, optionally additional cells open and close, all in that row, then row closes, all ditto if you have a second row open and close, and then table closes. If you have multiple rows and varied cell counts, then you can use tricks such as <td colspan=[count]> and <td rowspan=[count] -- the screen might make more sense if you try that and highlight a printout. A cell can span rows, and can span columns of cells. If you want two rows PER ROW, then you put a table in a cell, ditto next door to the right, both in one row of the parent table. It makes sense when you mess with it hands-on. To some extent you are making a counterpart to a traditional Chinese slide puzzle that sits there -- in making it you get to see where the cells plop in place or make room for each other or squirt off to when you change code.
There is also a built-in visual aid that you can use when the screens render while you work on tables: <table border="1" will show you where the table parts are. You will normally want to turn that off, as <table border="0", when you're done with it, so as to make the table(s) themselves not apparent.
Then you can force the table(s) to put cells where you want particular features or other content to appear. You can see those by putting letters into cells or giving the cells colors.
Then you can put php into the CELLS where you want it to execute cell by cell. If an echo is outside a cell it will often appear above the whole table somewhere (put between a <td> and </td>) Be certain not to fiddle with the php syntax. You can intermingle the table parts and the php segments but if you pay attention to where cells and where php segments are, then you can easily make the two play onto the screen as you intend.
Where you have a foreach execution, it will loop until there's no remaining "each" to add. If it does that all within a cell, then every "each" will be there, too. If you see a complete oh, oh, oops, or ulp, then rearrange where foreach happens.
(2) Then where you have that lower left "Choose Your Sleeve" followed by that upper right "--- Please Select ---", you CAN, FOR EXAMPLE, put everything before that in sequential single-cell rows in one table, and then that and what follows it in sequential single-cell rows in a second single table, with the two tables each set width="45%" or the like. That forces two columns. Once you see that fall into place, you can fiddle with it to see how you can break it and mend it. For example, valign="top" will force both columns to start at the tops of their own tables; but valign="middle" will not.
Who is online
Users browsing this forum: No registered users and 9 guests


